
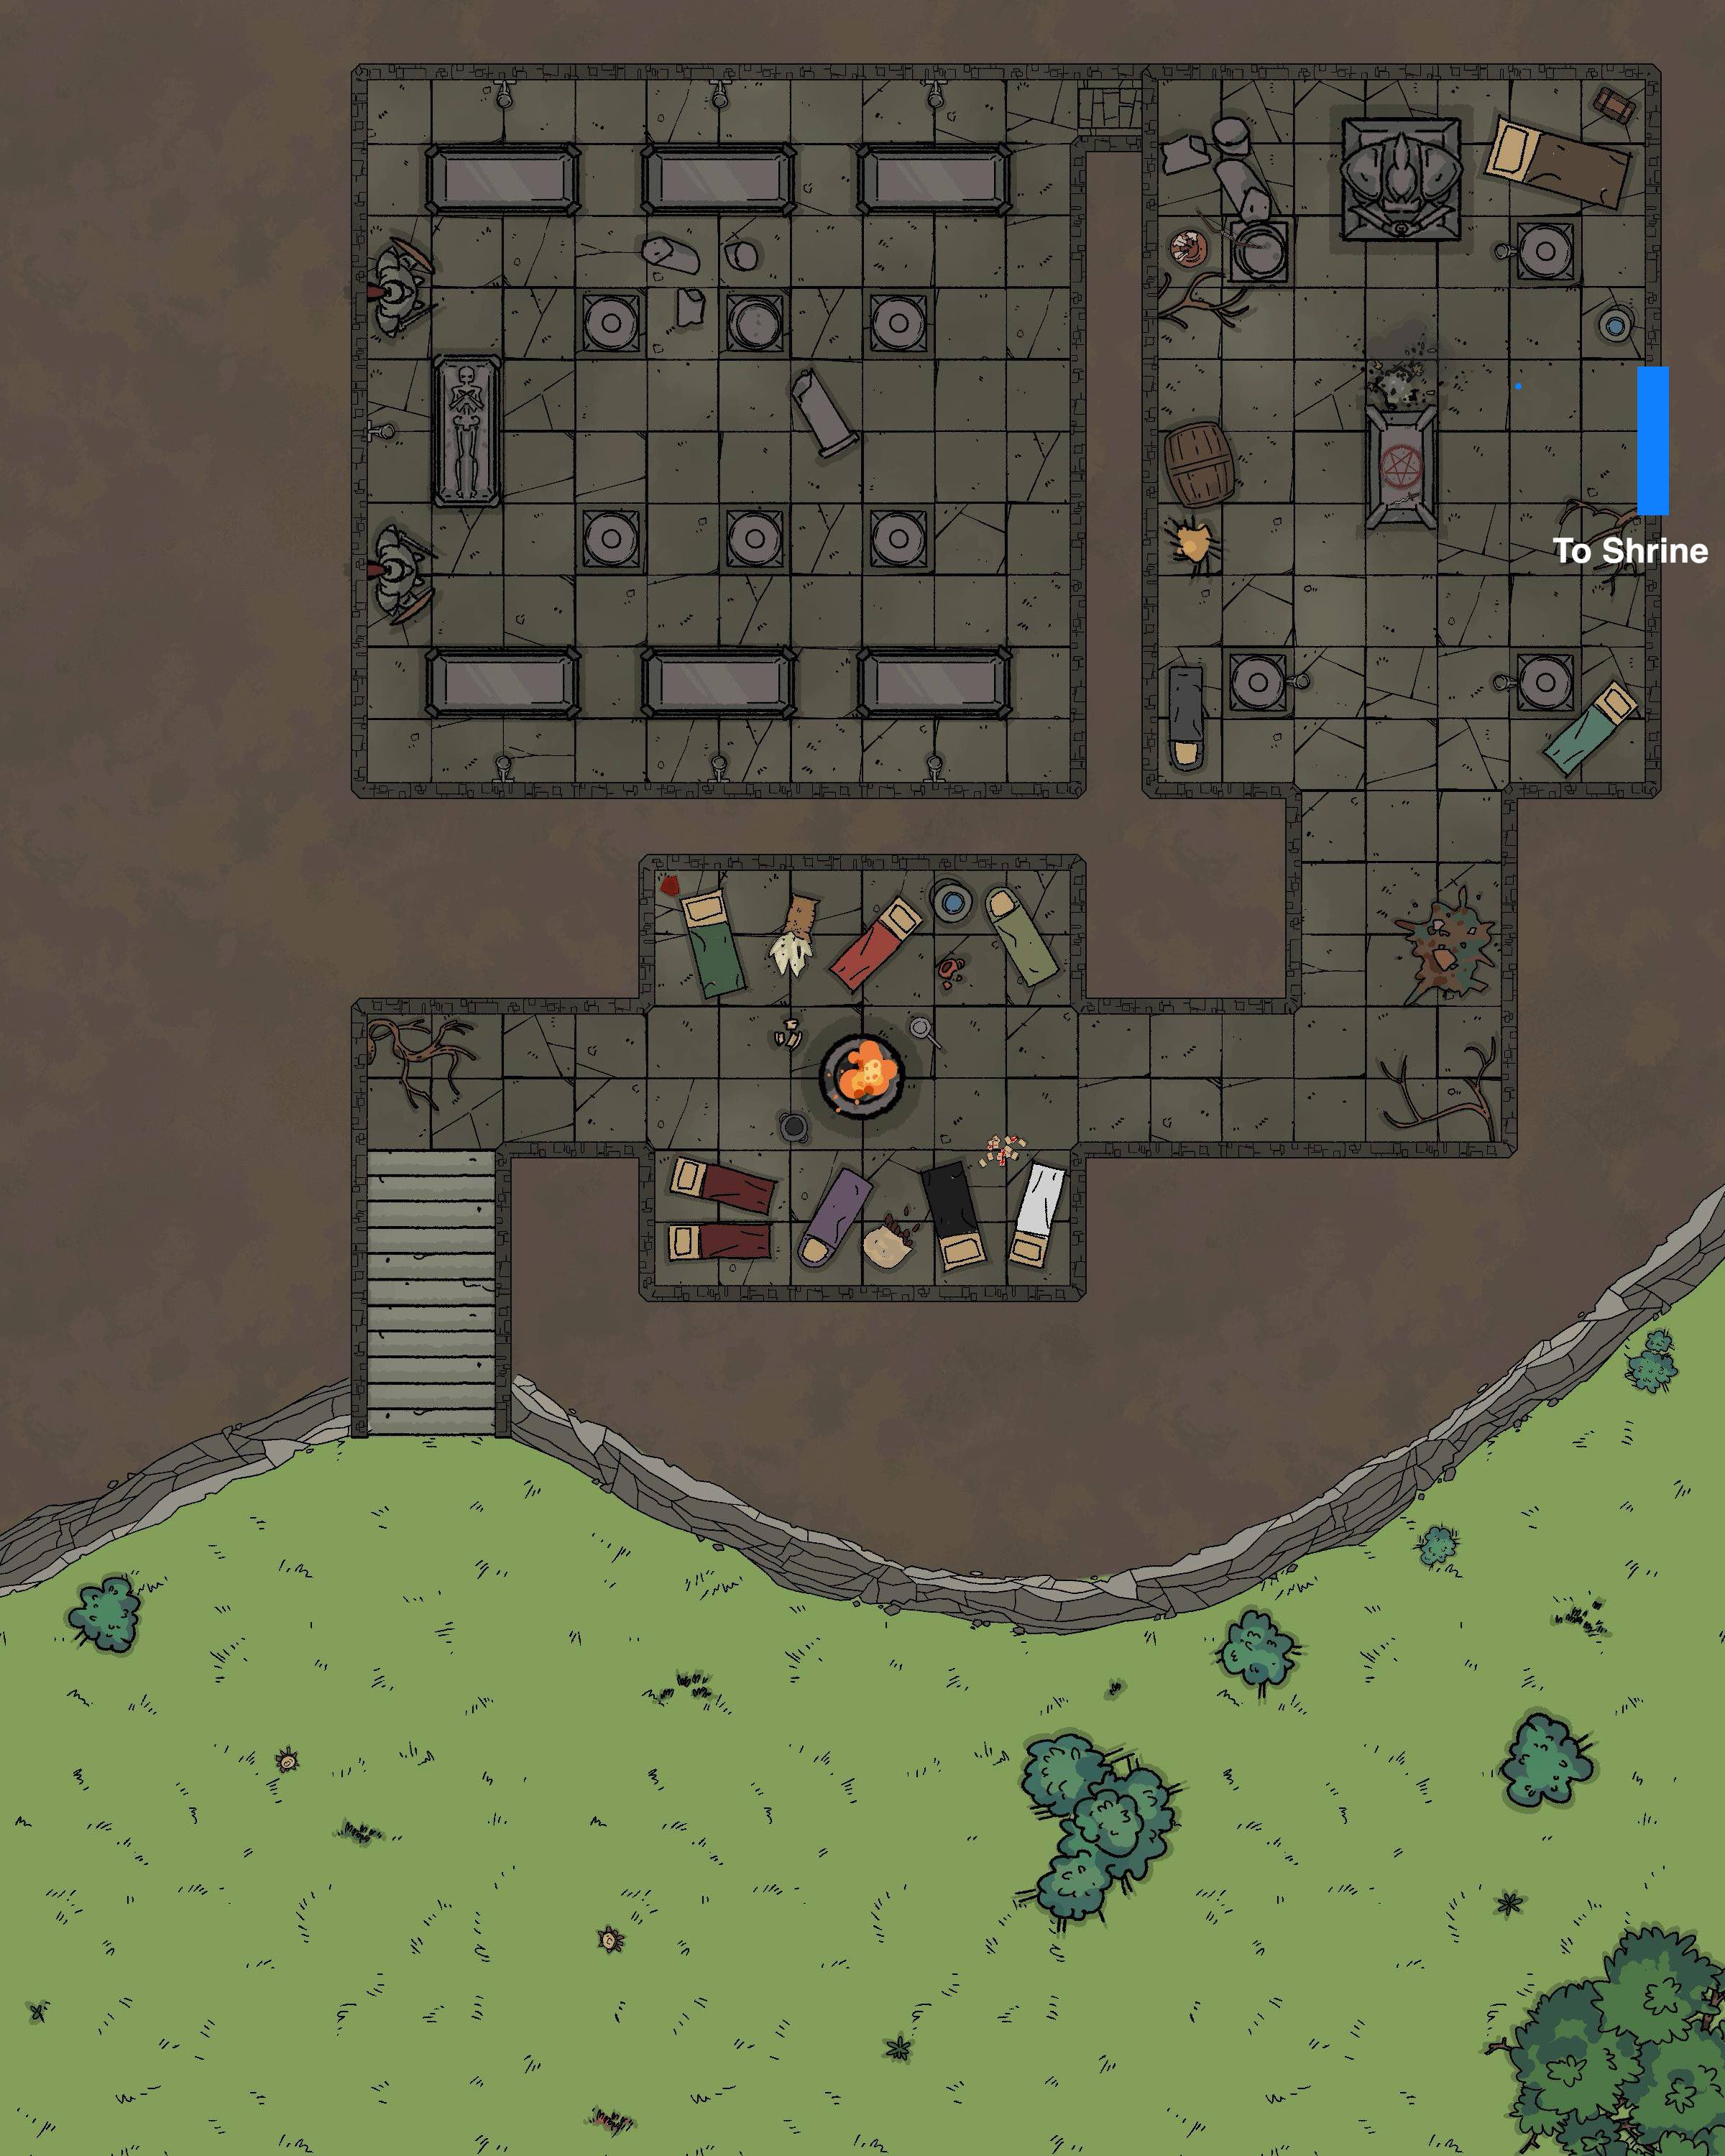
The bivuoac area was recently a staging area for The Red Flux and her undead, led by Thraask Bloodtide. There is the smell of death and gunpowder, delivered here by Ravana.
The gnolls were paid by The Red Flux, who gave the pack leader gold and the +1 Glaive.
1. Guards
- 2 Fangs of Yeenoghu guard the entrance. They patrol the area, and may. not be there (25% chance) if the PCs don't scout out first. Marked as Yeenoghu's favourite, the lucky recipient becomes a fang of Yeenoghu, the chosen of the Gnoll Lord.
2. Bivouac and Oath
- 6 Gnolls
- 1 Gnoll Flesh Gnawer (Volo)3. BBG and Statue
In the center is an iron offering bowl the gnolls use as a brazier for cooking a pair of almiraj.
Engraved in the wall:
Carved deep into the polished stone walls of the Tomb of the Ascendant Flame, the oath serves as a solemn pledge for all who would bear Asura's light and wield her fire.
"By the Sacred Flame of Asura, I pledge myself to the path of truth, to walk with fire in my heart and light in my eyes. I vow to shatter illusions and to seek the flame that lies within, for life is but a passing shadow, and only in death may we embrace the final truth."
"I will kindle hope where shadows linger, and bring warmth where darkness encroaches. I will protect the helpless as flame shields the hearth, and inspire the weary as fire awakens the forge. With each breath, I swear to carry Asura's torch, casting her light into the depths of this world's illusions."
"Asura, guide my steps and guard my soul; make me a beacon for your eternal fire. May my life burn as an offering upon your altar, and may I become one with your flame in the light beyond."
The engraving radiates a subtle warmth, and those who speak the words feel a momentary flicker of light within, as if touched by Asura's presence.
3. Trap
Perception DC15
Locking Pit. This pit trap is identical to a hidden pit trap, with one key exception: the trap door that covers the pit is spring-loaded. After a creature falls into the pit, the cover snaps shut to trap its victim inside. A successful DC 20 Strength check is necessary to pry the cover open. The cover can also be smashed open. A character in the pit can also attempt to disable the spring mechanism from the inside with a DC 15 Dexterity check using thieves’ tools, provided that the mechanism can be reached and the character can see. In some cases, a mechanism (usually hidden behind a secret door nearby) opens the pit.
4. Statue Room
Boss Room (difficult terrain as there are wine bottles scattered everywhere):
- Gnoll Greater Pack Lord
- Gnoll Greater Pack Lord, Thraask Bloodtide
- Thraask has 2 Kegs of Gunpowder and will threaten to use it as a weapon, but not until he's within distance with the PCs.
- Setting fire to a container full of gunpowder can cause it to explode, dealing fire damage to creatures within 10 feet of it (7d6 for a keg). A successful DC 12 Dexterity saving throw halves the damage. Setting fire to an ounce of gunpowder causes it to flare for 1 round, shedding bright light in a 30-foot radius and dim light for an additional 30 feet.
Thraask Bloodtide
Medium humanoid (gnoll), chaotic evil Armor Class 16 (scale mail)
Proficiency Bonus +3 ACTIONSBite. Melee Weapon Attack: +5 to hit, reach 5 ft., one target. Hit: 5 (1d4 + 3) piercing damage. Glaive +1. Melee Weapon Attack: +6 to hit, reach 10 ft., one target. Hit: 8 (1d10 + 4) slashing damage. Longbow. Ranged Weapon Attack: +4 to hit, range 150/600 ft., one target. Hit: 6 (1d8 + 2) piercing damage. Incite Rampage (Recharge 5-6). Up to two creatures the gnoll can see within 30 feet of it can use their reactions to make a melee attack if they can hear the gnoll and have the Rampage trait. BONUS ACTIONSRampage. When the gnoll reduces a creature to 0 hit points with a melee attack on its turn, the gnoll moves up to half its speed and makes a bite attack. Also:Also: Jewels of Chan-KaanulRed Metal GauntletsJewel of Earth’s Might (Ruby)
Earth Tremor Source: Xanathar's Guide to Everything 1st-level evocation Casting Time: 1 action You cause a tremor in the ground in a 10-foot radius. Each creature other than you in that area must make a Dexterity saving throw. On a failed save, a creature takes 2d6 bludgeoning damage and is knocked prone. If the ground in that area is loose earth or stone, it becomes difficult terrain until cleared. At Higher Levels. When you cast this spell using a spell slot of 2nd level or higher, the damage increases by 1d6 for each slot level above 1st. |
Treasure:
- 1100 cp, 70 pp
- Small, unusually clean, red sack with 20, 100gp white pearls from The Red Flux, meant to be payment to the troops, or whatever.
- 3 x diamond (50 gp), chalcedony (50 gp), 2 x jasper (50 gp), 2 x onyx (50 gp), 2 x quartz (50 gp),
- 8 cases of fine wine (96 bottles) from Queendom of Lysara. ten bottles of fine wine (each worth 100gp).Each case weights 25 pounds. Another 4 cases are empty with. bottle strewn everywhere.
- 6 cases of silk rope (5 50' bundles each) (25 pounds per crate)
- Quaal's Feather Token, Tree
- 2 Keg of Gunpowder, worth 1,000gp each
- Letter from Thraask Bloodtide to Van Droth
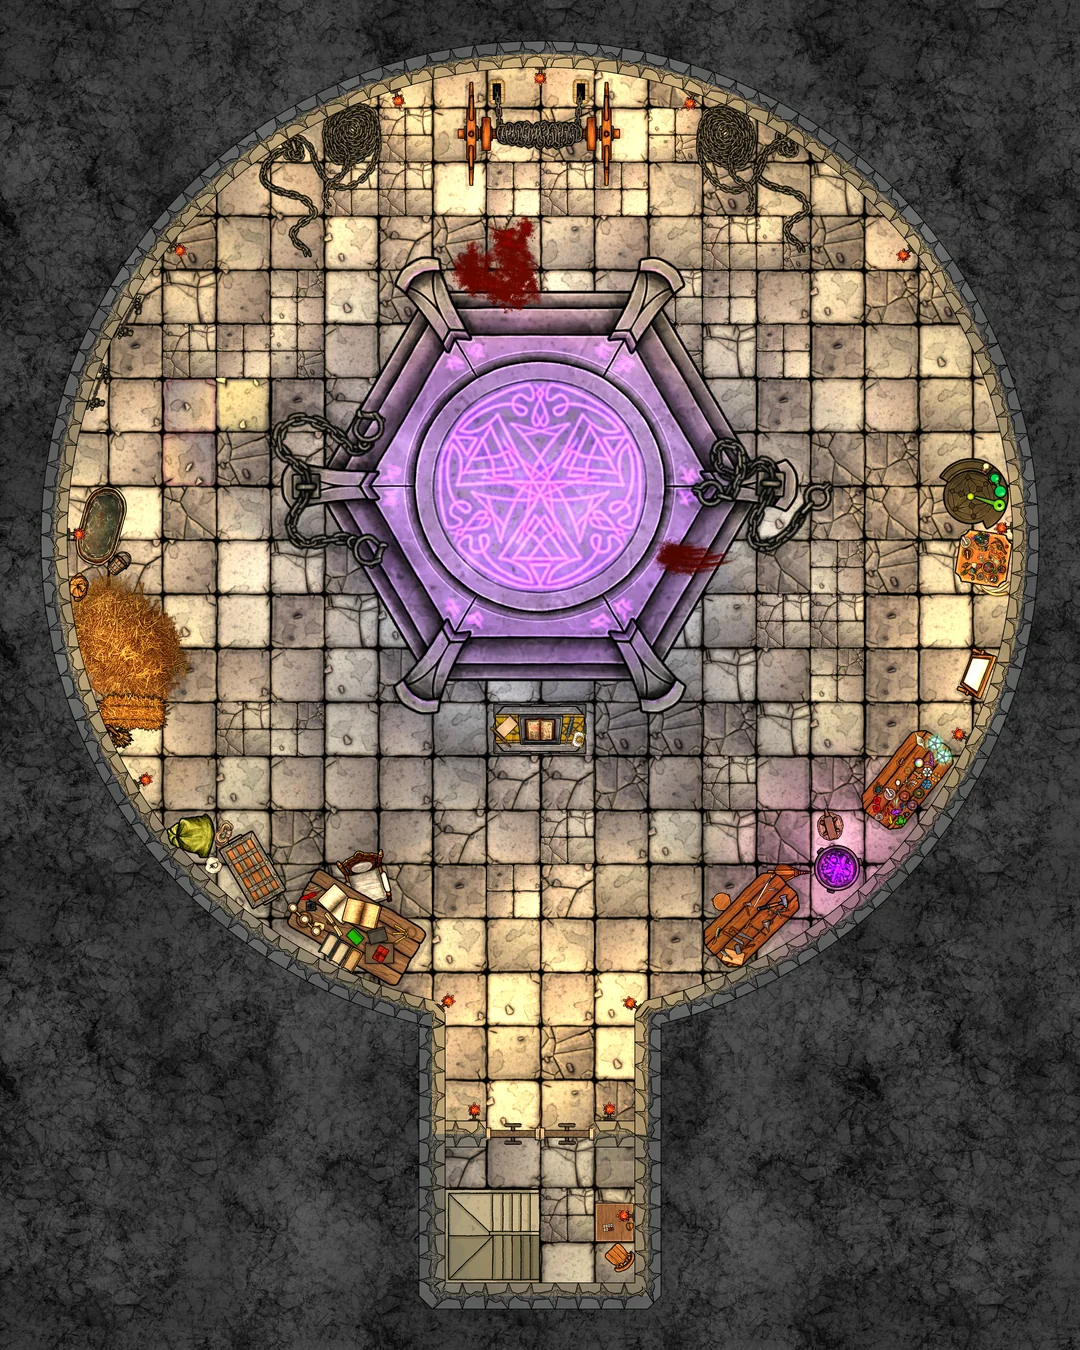
5. Shrine to Hadregash the Lord of Blades
- A Great Old One worshiped by some fringe gnoll sects, Hadregash embodies violence and pain as forms of exaltation. Gnoll cultists worshiping Hadregash might mutilate themselves and their victims as offerings, creating horrific displays of bloodshed in hopes of attracting his gaze. Hadregash is a cruel, warlike entity that values violence for its own sake, rewarding only those who prove their worth in brutal, gory displays.
3 Gnoll Cultists of Hadregash with 6 Gnoll Mooks (1hp) engaged in ritual.
1. Gnoll Bloodscourge
These gnolls have honed a brutal, reckless fighting style, sacrificing their own safety to inflict grievous wounds upon their enemies. Their worship of Hadregash is marked by ritual scars and a fevered thirst for blood.
- Armor Class: 14 (hide armor)
- Hit Points: 45 (6d8 + 18)
- Speed: 30 ft.
- Alignment: Chaotic Evil
STR 14 (+2) | DEX 12 (+1) | CON 16 (+3) | INT 8 (-1) | WIS 10 (+0) | CHA 8 (-1)
Skills
Perception +2, Intimidation +2
Senses
Darkvision 60 ft., Passive Perception 12
Languages
Gnoll
Abilities
Blood Frenzy. The Bloodscourge has advantage on melee attack rolls against creatures that are missing any of their hit points.
Reckless Abandon. As a bonus action, the Bloodscourge can take 1d6 damage to gain advantage on all melee weapon attacks until the end of its turn.
Actions
Multiattack. The Bloodscourge makes two attacks with its scimitar.
Scimitar. Melee Weapon Attack: +4 to hit, reach 5 ft., one target. Hit: 6 (1d6 + 2) slashing damage.
Gore (Recharge 5-6). The Bloodscourge charges forward in a reckless lunge. Melee Weapon Attack: +4 to hit, reach 10 ft., one target. Hit: 10 (2d6 + 2) slashing damage, and the target must succeed on a DC 12 Strength saving throw or be knocked prone.
2. Gnoll Flayer
The Flayers are the cult’s torturers and enforcers, carrying whips that they wield with brutal precision. They revel in breaking the will of their enemies, fighting with a cruel flair that speaks to Hadregash's delight in pain and suffering.
- Armor Class: 13 (hide armor)
- Hit Points: 33 (6d8 + 6)
- Speed: 30 ft.
- Alignment: Chaotic Evil
STR 12 (+1) | DEX 14 (+2) | CON 12 (+1) | INT 9 (-1) | WIS 10 (+0) | CHA 13 (+1)
Skills
Perception +2, Intimidation +3
Senses
Darkvision 60 ft., Passive Perception 12
Languages
Gnoll
Abilities
Cruel Strike. When the Flayer hits a creature with a whip, the target must succeed on a DC 12 Constitution saving throw or suffer an additional 1d4 necrotic damage and have disadvantage on its next attack roll.
Aura of Pain. Creatures within 10 feet of the Flayer at the start of their turn take 2 necrotic damage if they have fewer than their maximum hit points remaining.
Actions
Multiattack. The Flayer makes two attacks with its whip.
Whip of the Eldritch Maw. Melee Weapon Attack: +4 to hit, reach 10 ft., one target. Hit: 5 (1d4 + 2) slashing damage.
Agonizing Strike (Recharge 5-6). The Flayer lashes out with terrifying force. Melee Weapon Attack: +4 to hit, reach 10 ft., one target. Hit: 8 (2d4 + 2) slashing damage. The target must succeed on a DC 12 Wisdom saving throw or be frightened until the end of the Flayer’s next turn.
3. Gnoll Blademystic
These gnolls are mystics of Hadregash, bearing enchanted, blood-stained blades and chanting dark incantations during combat. Their worship grants them a touch of magic, which they wield to enhance their attacks and hinder their foes.
Abilities
Blessing of Hadregash (1/Day). As a bonus action, the Blademystic can cast bane (DC 12) on up to three creatures within 30 feet.
Arcane Blade. The Blademystic’s attacks are considered magical for the purpose of overcoming resistance and immunity to non-magical attacks and damage.
Actions
Multiattack. The Blademystic makes two attacks with its short sword.
Short Sword. Melee Weapon Attack: +4 to hit, reach 5 ft., one target. Hit: 6 (1d6 + 2) piercing damage.
Spiteful Hex (Recharge 6). The Blademystic curses a creature within 30 feet. The target must succeed on a DC 12 Wisdom saving throw or take 2d6 necrotic damage and have disadvantage on its next attack roll.
These three cultists create a variety of tactical challenges that emphasize Hadregash’s themes of pain, cruelty, and dark magic. The Bloodscourge charges recklessly, the Flayer lashes out with debilitating strikes, and the Blademystic enhances its attacks with dark enchantments, making each a distinct threat to adventurers who cross their path.
Summoning Maw of Hadregash
6. A statue of an Asuran knight stands with his sword raised outward, as if to "knight" a squire.
Puzzle: The Statue of the Asuran Knight
The players come upon a grand statue of an Asuran knight, his expression serene but resolute, his armor etched with the symbols of Asura. His sword is raised outward, as if in the act of "knighting" someone. Around the statue, faint carvings glow subtly, revealing motifs of light, flame, and a recessed sun.
Directly in front of the statue is a sealed door, with the faint outline of flames carved upon it. The door appears solid, yet an inscription at its base suggests it may open through something other than force.
Hints and Clues for the Puzzle
- Observing the Statue: If players examine the statue closely, they notice small, holy symbols of Asura surrounding the recessed sun on the statue's chestplate, alongside depictions of a shield and sword. These images subtly hint at the Order of the Ascendant Flame and reference their oath.
- Knowledge of the Order: A player proficient in Religion or History recalls that members of the Order of the Ascendant Flame—knights of Asura—swear an oath that includes the promise to protect the innocent and to shine Asura’s light into darkness.
- Light and Shadow: The flame motifs around the statue and door seem to react to nearby light sources, flickering as if alive. Examining the carvings, players find phrases such as "only those who walk through the flame may pass" and "carry Asura's torch". This reinforces the importance of the Oath of Asura and suggests that a line from it might unlock the door.
The Solution
"I swear to carry Asura's torch, casting her light into the depths of this world's illusions."
To open the door, players must recite aloud the following line from the Oath of the Ascendant Flame:
Puzzle Outcome
When this line is spoken:
- The door flares to life, erupting in a shimmering wall of fire.
- The flame forms a portal, though no heat emanates from it, only a sense of warmth and encouragement.
Stepping Through the Flame:
- When the players walk through, they emerge on the other side, unharmed, and find themselves in a hidden chamber filled with symbols of Asura's light and artifacts of the Order.
Failure or Wrong Answer:
- Speaking an incorrect phrase or attempting to bypass the flame with force will cause the flame to flare up violently, rebuffing any attempts to pass.
- The players must try again, considering the words of the Oath to move forward.
This puzzle combines the symbolism of light, flame, and Asura’s oath with the courage to "walk through the flame," rewarding players with access to the hidden chamber beyond.
Visuals: The sarcophagus lid features a beautifully carved relief of a knight holding a shining sword, symbolizing the protector of the innocent. Once the correct phrase is spoken, the knight’s sword glows with the same light as the sword inside, hinting that the weapon is more than just a tool—it is a symbol of the Order’s oath.